Server IP Address Change
When the Aralco server’s internal or external IP address changes, all Back Office and Point of Sale registers need to be updated accordingly.
A couple of ways to find the server’s IP address:
- If the server is located off-site, login to the server and go to the website https://www.whatismyip.com.
- If the server is located within the local network, login to the server, open a command prompt, and type ipconfig – look for the line that has the IPV4 address – should look something like 192.168.0.5, 10.10.0.200, etc.
Changing Server IP in Back Office (BOS)
- Open the <drive:>\ARALCO\BOS\ARALCO.INI file with Notepad;
- Change the line SQL_SERVER_NAME=<IP address or server name> to reflect the name or IP address of the server (either will work);
- Save the file, and confirm you can log into Back Office;
- Repeat this process on each Back Office workstation.
Changing Server IP in Point of Sale
The Aralco POS program on each register uses the sync_local program to talk with the Back Office server and needs to be pointed to the new server. To do this:
- On the POS register, log into Point of Sale;
- Left click on the
 icon on the Windows taskbar repeatedly until the menu displays – you’ll need to click and pause, click and pause, click and pause:
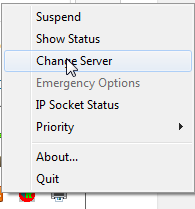
- Select Change Server, enter in the new IP address or server name, and click Test Connection – should show Successfull connected to <IP address or server name>;
- Click Ok to save, and the sync_local icon should go from red to yellow or green;
- Repeat this process on each POS register.
If you cannot get a successful connection, there is a network issue and you should check with your network administrator.