Setting Up Fingerprint Scanning
NOTE: A software license is required to activate the Fingerprint Scanner feature. Please contact the Aralco Sales Team for details.
After you’ve installed the hardware driver for the fingerprint scanners on each workstation, you’ll need to do a little bit of setup inside the Aralco system.
Finger Scan Option Activation
- Be sure the scanners are connected and functioning on each register;
- Log into Point of Sale;
- Navigate to Setup » Software Options » Settings (enter a user name and password with rights to change settings);
- Select Login Options » Login Method and choose one of the following:
- Fingerprint and Manual – To allow both methods;
- Fingerprint Only – No bypass ;
- UareU4500 – Specific type of fingerprint reader;
- Select Login Options » User Fingerprint Scanner and choose an option;
- Click on [Save] to complete.
Scan Staff Finger Prints
- Staff need to be setup first in the Back Office » Staff function;
- In Point of Sale, navigate to File Maintenance » Scan Finger Prints;
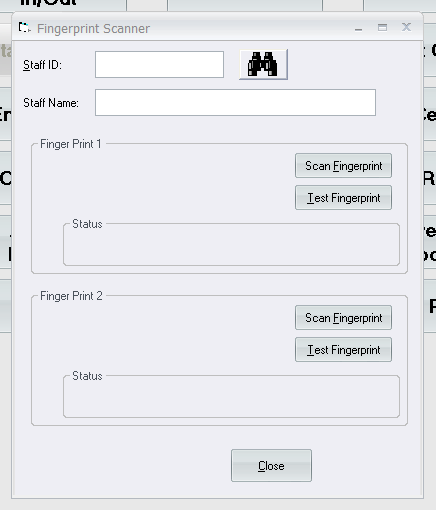
- Click on the binoculars and choose the staff member you want to scan fingerprints for;
- The the system supports two fingerprint records for each staff member. Under the Finger Print 1 region, click on [Scan Fingerprint]. Make sure the scanner light starts flashing. Place the right hand index finger only in the middle of the scanner glass area and wait until the screen displays the message Scan Successful;
- Repeat the process for a second finger.This is optional but highly recommended;
- Repeat the above steps for each staff member.
Staff Check In/Out – Reasons Setup
https://s3-us-west-2.amazonaws.com/aralco.videos/1_Staff_Check_In_and_Out.mp4
- In Point of Sale, navigate to File Maintenance » Staff Check In/Out Reasons;
- From this standard maintenance area you can Add, Edit, or Delete records;
- Click on Add and enter the following:
- Reason – a descriptive code to identify the reason for the staff member clocking in or out; e.g. Start Shift, Break In, Breack Out, End Shift, etc.;
- Seq # – identifies the order things occur in. For example, Start Shift would be 1, Break Out would be 2, Break In would be 3, and End Shift 4. It doesn’t matter what sequence you use (i.e. 10, 20, 30, 40, 999 etc.) just as long as they appear in order. This is used to show the staff members login/out activity;
- In or Out – select the radio button for the type of activity;
- Reason Description- this can be the same as the Reason or longer, more elaborate if you desire;
- Click on OK to complete the entry.
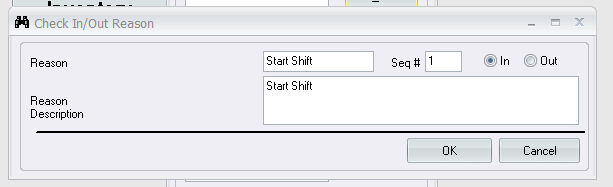
- Select Exit when done.
Staff Login/Out Procedure
- From the main Point of Sale screen select Start/End Shift;
- Select Staff Check In/Out;
- Have the staff member scan their finger;
- Choose the Check In/Out Reason and [Save];
- You will notice the hours added up for the end of day “staff total hours calculations”.
If you require further assistance, please contact our Support Department at 604-980-4199 ext 2., or click on this link to submit a support request.